While some developers assume that the classical ASP.NET validators support check boxes and radio buttons, this isn’t the case! There is a logical explanation for this; there is nothing much to check, the checkbox can only be checked or unchecked so what do you want to validate?
In some cases you might want to display an error if a check box or a radio button is unchecked, e.g. terms and conditions check box, if so, then this is the right validator for you. Read on if you are interested in the bits and pieces of how the control works or skip to the “Using The Validator” section if you are just interested in using it.
Background
Usually control classes that supports validation are decorated with the ValidationProperty attribute, for example, the TextBox control looks like this:
// more attributes...
[ValidationProperty("Text")]
// more attributes...
public class TextBox : WebControl, IPostBackDataHandler,
  IEditableTextControl, ITextControl
{
    ...
}
The ValidationProperty will point the validator at the property to validate against.
The CheckBox, RadioButton, HtmlInputCheckBox and HtmlInputRadioButton lack this attribute, accordingly, any standard validation control will throw an exception Control 'ControlID' referenced by the ControlToValidate property of 'ValidatorID' cannot be validated when set against one of these controls.
Architecture
This validator inherits, as in most validators, from BaseValidator and overrides method ControlPropertiesValid that issues this exception.
protected override bool ControlPropertiesValid()
{
  if (ControlToValidate.Trim().Length == 0) {
    throw new HttpException(
      string.Format(@"The ControlToValidate property of
      {0} cannot be blank.", ID));
  }

  Control control = FindControl(ControlToValidate);

  if (control == null) {
    throw new HttpException(
      string.Format (
        "Could not locate control with ID {0}",
        ID)
    );
  }

  if (!(control is CheckBox) &&
      !(control is RadioButton) &&
      !(control is HtmlInputCheckBox) &&
      !(control is HtmlInputRadioButton))
  {
          throw new HttpException(
          @"ControlToValidate can only be
          System.Web.UI.WebControls.CheckBox,
          System.Web.UI.WebControls.RadioButton,
          System.Web.UI.HtmlControls.HtmlInputCheckBox,
          System.Web.UI.HtmlControls.HtmlInputRadioButton");
  }

  return true;
}
The rest of the server side code is classical. The validator has a property called WarnIf which will reverse checking (when set to false, the validator will warn if the box is checked).
This is the client-side validation code:
function CheckValidatorEvaluateIsValid(val)
{
  var control = document.getElementById(val.controltovalidate);
  var warnif = val.warnif == 1 ? true : false;
  return control.checked ^ warnif;
}
Using the Validator
To use this validator from your Visual Studio IDE, you need to add the provided .dll to the toolbox.
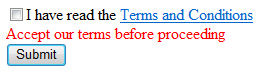
Drop the control on the form and assign it to the CheckBox/RadioButton that you want to check:
<at:CheckValidator
    Text="I have read the terms and conditions"
    ControlToValidate="_termsAndConditions"
Text="Accept terms before proceeding" />-
- *All suggestions and bug reports are welcome. I have also created the MultipleFieldsValidator validator control to tackle the problem of validating multiple controls.